
Instructions for printing out the profiling chart
There are a few pitfalls to watch out for when printing out the profiling chart(s), so to make the process less daunting, here are some directions to guide you through the process.
These instructions are written with PhotoPrint in mind, but the principles apply to other software and platforms as well.
"What do I need to achieve good results with a colour profile?"
The key word is Consistency:
- Make sure your printer has no clogged nozzles. These will subtly alter the colour balance of the printer, so a profile created from a test chart printed with clogged nozzles will give inaccurate colour once the heads are cleaned and the printer's working properly again!
- If you're using 3rd-party inks, make sure you have a good supply of ink from the same manufacturer and batch - cheaper inks can vary a great deal in colour between batches, and much more so between manufacturers.
- Likewise with paper - in these harder economic times some manufacturers have trimmed their ranges. Make sure you can easily obtain more of whichever type of paper you're using!
- You must use the same printer settings when printing using a profile as you used when printing the profiling chart. This is where PhotoPrint's "preset" system comes in handy. Once you've made the settings as per the following paragraphs, it is recommended that you save the settings in a preset. You can add the profile, when you receive it, to that preset.
"Which printer settings should I use?"
- In general, you need to make sure the printer is using the right amount of ink for the paper you're using. Are blacks deep and dark? Are colours strong? Is ink soaking through the paper or puddling on the surface? You can use the Density Check strip to make a rough evaluation of this - if the printer is over-inking you should see signs of ink "bleeding" between the dark reds, greens and blues.
- Don't worry too much about any colour cast in the greys - the profile will correct for this.
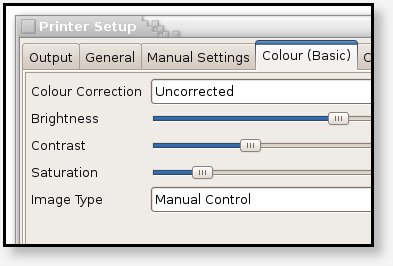
- You should also turn off any colour correction performed by the printer driver. To do this in PhotoPrint, go to the Print Setup dialog, and change the "Colour Correction" mode to "Uncorrected", as shown here.
- You should also turn off "Borderless" mode when printing the testchart - though you can turn that back on afterwards if you wish.
 "Do I need to make any other settings?"
It's very important to ensure that no existing printer profile is in use when printing the profiling targets. If this is the first time you've used a profile with PhotoPrint then things should already be set up as you need them. If you're already using a profile, however, it's very easy to forget to disable it!
Go to the Settings menu -> Colour Management, and make sure the Printer Profile checkbox is unchecked, and the Colour space is set to RGB.
Once you've chosen your printer settings and have verified that the ink coverage is about right, save a preset, so you can recall these settings quickly and easily.
 "How should I make the actual print?"
If you're using PhotoPrint:
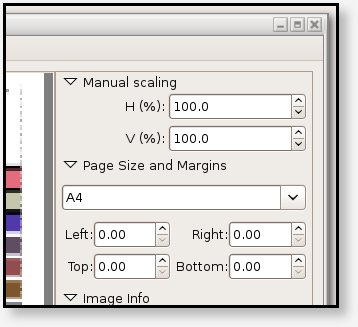
- Go to the Layout menu and choose Manual Size.
- Choose your paper size, and set all four margins to zero.
- Drag the profiling target onto the page
- Adjust the image's scaling to 100% both horizontally and vertically.
- If there is a second page to the profiling traget, repeat for the second page.
